Introduction to BIOS
The BIOS, or Basic Input/Output System, is a critical component of your computer’s architecture. It acts as the bridge between the computer’s hardware and its operating system, ensuring that all hardware components are functioning correctly before the operating system loads. The BIOS is responsible for the POST (Power-On Self-Test), initializing hardware components, and loading the bootloader. Understanding how to access and navigate the BIOS can be essential for various tasks, such as troubleshooting, installing new hardware, or modifying system settings.
Why Access the BIOS?
Accessing the BIOS is necessary for several reasons. You might need to install new hardware, update the system’s firmware, or change the boot order to boot from a USB or CD drive. Additionally, accessing the BIOS can help troubleshoot hardware issues by enabling or disabling specific components or features. Knowing how to access the BIOS empowers you to manage your computer’s hardware settings effectively, ensuring optimal performance and stability.
Warning Before Modifying BIOS Settings
Modifying BIOS settings should be done with caution. Incorrect settings can lead to system instability, performance issues, or even hardware damage. Always ensure you understand the changes you are making and consider consulting your computer’s documentation or a professional if unsure.
Before making any changes, it is wise to document the original settings. This way, if something goes wrong, you can revert to the previous configuration. Additionally, only make necessary changes and avoid altering settings you do not fully understand.
Steps to Access BIOS in Windows 11
Using the Settings Menu

One of the most straightforward methods to access the BIOS in Windows 11 is through the Settings menu. Here are the detailed steps:
- Start by clicking on the Start menu and selecting the Settings application.
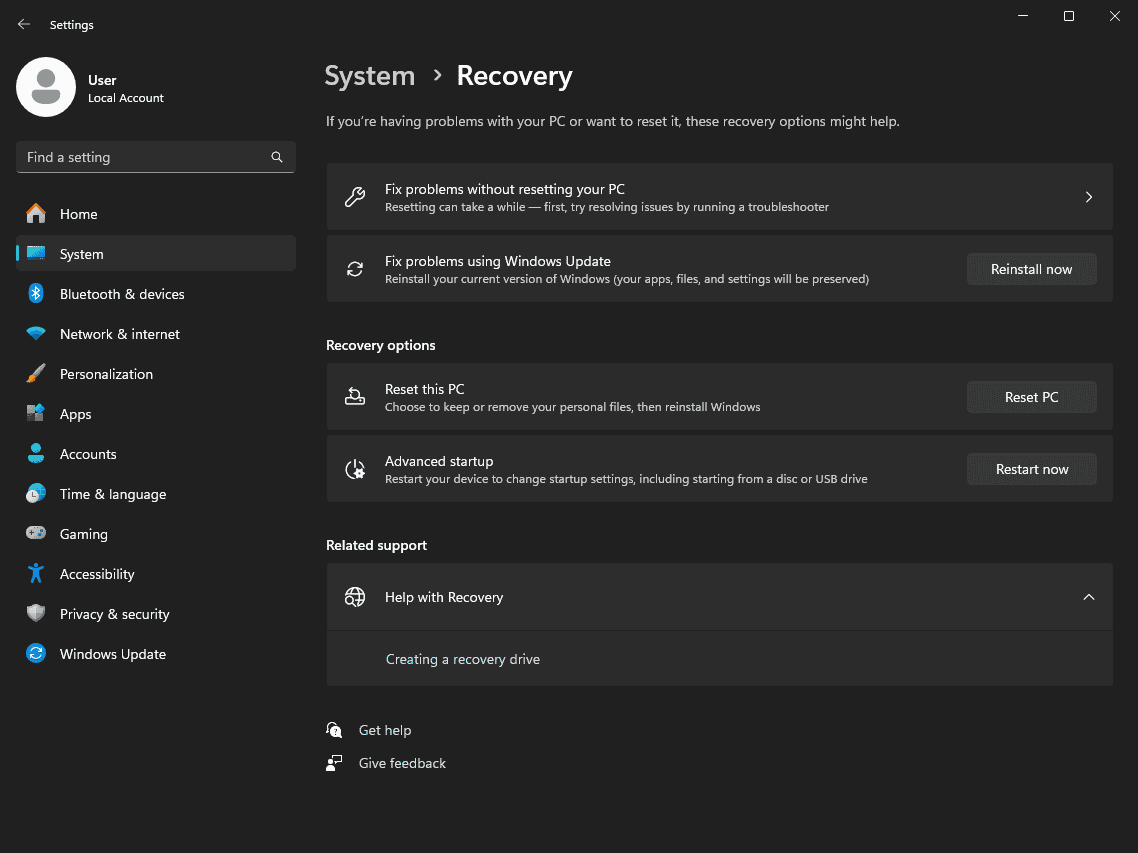
- Within Settings, navigate to System and then select Recovery.
- In the Recovery section, look for the Advanced startup option. Here, you will find a Restart now button. Click this button to initiate the process.
- Your computer will restart and present you with a screen titled Choose an option. Select Troubleshoot from this menu.
- Next, navigate to Advanced options and then select UEFI Firmware Settings.
- Finally, click the Restart button. Your computer will reboot directly into the BIOS.
This method provides a user-friendly interface to access the BIOS, especially for those unfamiliar with traditional key combinations.
Accessing BIOS via the Power Menu Shortcut
Another efficient way to enter the BIOS is through the Power menu. This method involves using the Shift key during a restart:
- Locate the power options on your computer, either through the Start menu or the lock screen.
- Press and hold the Shift key on your keyboard while selecting the Restart option.
- After the computer restarts, you will be taken to the Choose an option screen.
- Select Troubleshoot, followed by Advanced options, and then UEFI Firmware Settings.
- Click Restart to boot into the BIOS.
This shortcut is useful for quickly accessing the BIOS without navigating through multiple settings menus.
Entering BIOS by Interrupting the Boot Process
For users familiar with the boot process, directly interrupting the boot sequence can also access the BIOS:
- Restart your computer.
- During the restart, watch for your manufacturer’s logo to appear. At this moment, press the key designated to enter BIOS. Common keys include F1, F2, F10, ESC, or DEL, but this can vary depending on your computer’s manufacturer.
- If timed correctly, pressing the appropriate key will bring you directly into the BIOS.
This method is quick but requires precise timing and knowledge of the correct key for your specific computer model.
Navigating and Modifying BIOS Settings
Once you have accessed the BIOS, you will encounter a text-based interface with various menus. These menus allow you to adjust settings for hardware components, such as the system clock, boot priority, and enabling or disabling specific features.
Adjusting Boot Order: If you need to boot from a USB or CD drive, navigate to the Boot menu. Here, you can change the order of boot devices, ensuring that your preferred device is prioritized during startup.
Enabling/Disabling Hardware: The BIOS allows you to enable or disable specific hardware components. This can be useful for troubleshooting hardware issues or optimizing system performance.
Updating Firmware: Some BIOS interfaces provide options for updating firmware. Ensure you follow the manufacturer’s instructions carefully, as incorrect updates can lead to system instability.
Conclusion
Accessing and navigating the BIOS in Windows 11 is a valuable skill for managing your computer’s hardware settings. Whether you are troubleshooting issues, installing new hardware, or updating firmware, understanding how to enter the BIOS can empower you to optimize your system’s performance and stability. Always proceed with caution when making changes to BIOS settings and seek professional assistance if needed. With these guidelines, you can confidently manage your Windows 11 BIOS and ensure your computer operates smoothly.

