A hostname is a unique identifier assigned to a device connected to a network. This name helps distinguish the device from others on the same network, allowing for easier management and communication. Hostnames play a crucial role in network operations, from identifying devices to facilitating seamless connections across local and wide-area networks.
Why Hostnames Exist
Hostnames exist to simplify the process of identifying and communicating with devices within a network. In the early days of networking, devices were primarily identified by their IP addresses, which are numerical labels assigned to each device connected to a network. While IP addresses are effective for routing and communication, they are not user-friendly. Humans find it easier to remember and use names rather than long strings of numbers. This is where hostnames come into play.
The Pre-Hostname Era
Before the advent of hostnames, devices relied solely on IP addresses for identification and communication. This system worked but had significant limitations:
- Complexity: Remembering and managing numerical IP addresses is cumbersome, especially as networks grow in size.
- Error-Prone: Manually entering IP addresses increases the likelihood of errors, leading to potential communication issues.
The Introduction of Hostnames
To address these challenges, the concept of hostnames was introduced. A hostname is a human-readable label assigned to a device, making it easier to identify and interact with. For example, instead of using an IP address like 192.168.1.10, you can use a hostname like Office-PC. This simplification improves user experience and reduces the risk of errors.
Key Uses of Hostnames
- Network Identification: Hostnames make it easier to identify and manage devices within a network.
- Server Connections: When connecting to a remote server, a hostname can be used instead of an IP address for convenience.
- DNS Resolution: Domain Name System (DNS) uses hostnames to resolve human-friendly names to IP addresses, facilitating web browsing and other network activities.
How to Check Your Hostname in Windows
Checking your hostname in Windows is a straightforward process. Here are the steps:
Method 1: Using the Command Prompt

- Open Command Prompt:
- Press
Windows + Rto open the Run dialog box. - Type
cmdand pressEnter.
- Press
- Enter the Command:
- In the Command Prompt window, type
hostnameand pressEnter. - The current hostname of your device will be displayed.
- In the Command Prompt window, type
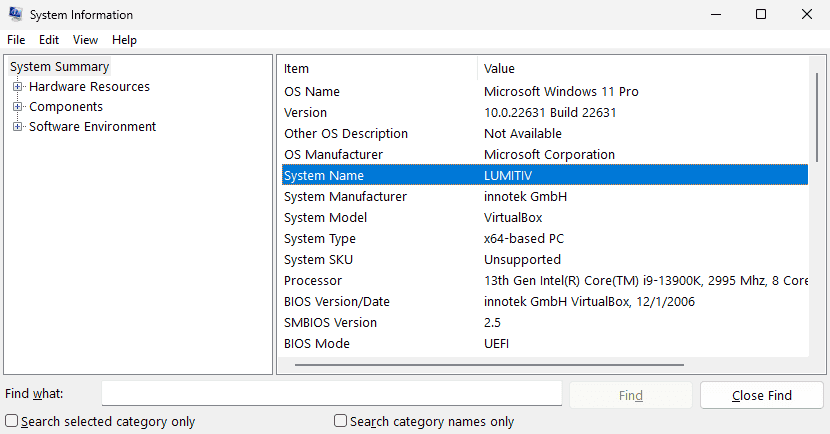
Method 2: Using System Information

- Open System Information:
- Press
Windows + Rto open the Run dialog box. - Type
msinfo32and pressEnter.
- Press
- Find the Hostname:
- In the System Information window, look for the “System Name” field. This field displays your current hostname.
How to Change Your Hostname in Windows
If you need to change your hostname, follow these steps:
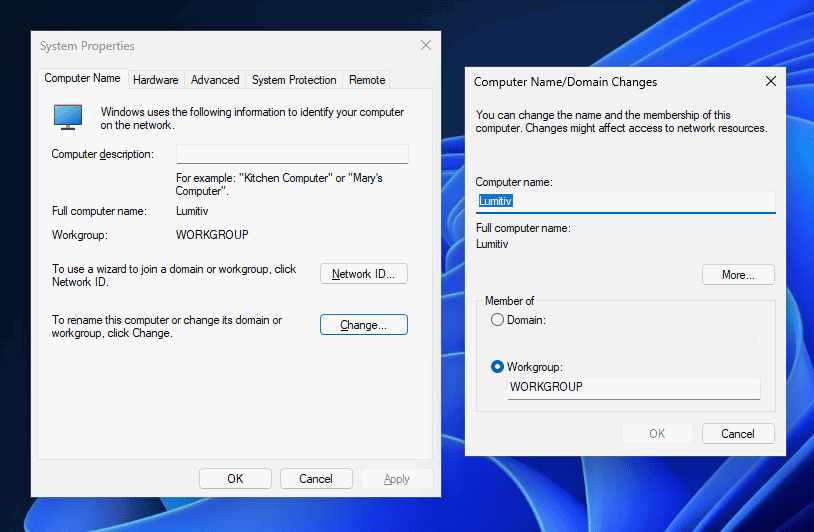
Method 1: Using System Properties

- Open System Properties:
- Press
Windows + Rto open the Run dialog box. - Type
sysdm.cpland pressEnter.
- Press
- Change the Hostname:
- In the System Properties window, go to the “Computer Name” tab.
- Click the “Change…” button next to “To rename this computer or change its domain or workgroup, click Change.”
- In the Computer Name/Domain Changes window, type the new hostname in the “Computer name” field.
- Click “OK” to apply the changes.
- Restart Your Computer:
- You will be prompted to restart your computer for the changes to take effect. Save any open work and restart your computer.
Method 2: Using Command Prompt (For Advanced Users)
- Open Command Prompt as Administrator:
- Press
Windows + Rto open the Run dialog box. - Type
cmd, then pressCtrl + Shift + Enterto open Command Prompt as an administrator.
- Press
- Change the Hostname:
- Type the following command and press
Enter:shellCopy codewmic computersystem where name="%computername%" call rename name="NewHostname" - Replace
NewHostnamewith the desired hostname.
- Type the following command and press
- Restart Your Computer:
- Restart your computer for the changes to take effect.
Conclusion
Knowing how to check and change your hostname in Windows is essential for effective network management. Whether you’re troubleshooting network issues, setting up a new device, or simply personalizing your computer, these steps will help you accomplish your task efficiently.

